I have a lot of my personal data (photos, music, etc.) stored on a RAID1 array (two drives that mirror each other so that if one drive dies the other has all of the data). Having my data on a RAID array gave me a lot of confidence that the data was secure…until it died last week. The RAID controller bit the dust, one of the two drives died, and the partition table of the other drive was corrupted. I couldn’t access the data using any windows utilities or fdisk, gdisk, gparted or ddrescue. I realized I hadn’t backed that storage up in more than a year.
It was starting to look grim, when I read about testdisk and gave it a try…and it worked like a champ. testdisk recognized the damaged partition and and gave me access to the NTFS file system. I was able to copy the data onto a good drive so all is good (and I’m going to be a lot better about backups). Thanks testdisk!
Author Archives: David Albert
ATtiny
Every now and then you need an electronic component and there just isn’t a good match available…necessity is the mother of invention so why not make your own? The problem was I had a very tight cost budget, very little PCB space, and was behind schedule…I needed a cheap, tiny solution FAST. Fortunately, I found the ATtiny which is an 8-bit AVR micro-controller available in packages as small as SOT23-6 package (about the size of the head of a pin) that costs $0.28 in small quantity and the more powerful ATTiny13A that costs $0.35 and is available in SOIC8 and DIP8.
I needed to generate a 5V PWM output to drive a MOSFET for programmable closed-loop control of the speed of two types of DC motors in a very tiny space. There aren’t that many *really* small micro-controllers in packages that are reasonable to prototype with (I hate prototyping with QFN and BGA packages). I considered a few including the Microchip PIC10F322 (also SOT23-6) and the STM8 series (supports the great STLink debug environment). I eventually counted out the PIC because the development environment was so unfriendly (I’m done with expensive proprietary compilers) and counted out the STM8 because even though I’m quite experienced with the STM32, getting the peripherals programmed properly can be complex and I needed a solution fast, so I chose the ATTiny.
I used avr-gcc as the C compiler which is fast, familiar, and generates tight code (you can’t go wrong with gcc). Microchip has breadboard-friendly DIP-8 versions of the ATtiny13A and the pin-compatible ATTiny25/45/85, so I could rapidly prototype a solution. The documentation is excellent, the peripheral set is rich and easy to use (unlike ST uCs which are incredibly flexible but accordingly complex). It was so easy that I was able to get the code fully functional in just a few hours having never use AVR processors before. I understand you can even use Arduino to program it (I didn’t).
Useful tools:
- Tiny AVR Programmer (see tutorial) OR USBasp-H6P (only $6 on amazon)
- avr-gcc pre-built binaries
- 100 ATtiny13 projects (lots of code examples and useful links)
- Product pages for ATtiny13 and ATtiny10
Some notes on flashing tools. The Atmel-ICE is an awesome debugger that uses only the RESET line to do all of its debugging! Unfortunately it doesn’t supply power so it’s a lousy tool for flashing the target. I haven’t found the perfect tool yet, but the TinyAVR and USBasp (see links above) work well. The main down-sides are that they don’t have enclosures and getting them set up can be annoying; you need to install Zadig and reconfigure them to use libusb-win32 (see instructions here)…after that, they work well.
It’s not going to replace the STM32 family for most of my applications, and the STM8 series is arguably better, but for those times I need a really cheap, really small solution, the ATtiny is a nice addition to the toolbox. You can even order them from Digikey with your software pre-installed for an additional ~$0.25/chip making them truly a custom hardware component!
Some useful links:
- AVRdude (command line flash programming utility)
- Soft UART (super useful for debugging)
- Even cleverer soft UART (uses a single-pin for Rx and Tx with a single transistor)
- Making good use of limited I/O (e.g. read lots of switches with one GPIO)
- C NOP implementation (needed e.g. after re-configuring GPIO before reading it)
- ATTiny Arduino Core (not a great idea with such limited resources?)
Asus cheap ultrabook
In my never ending quest for the perfect portable computing platform, I’ve come a step closer. There are loads of good ultrabooks, but most of them are *expensive*. I don’t want to carry/drop/lose a 1K+ device; my ideal portable is in the $300 range. Thus far, I’ve been using modified chromebooks, but some standard laptop/ultrabooks are finally getting into the right price range.
The Asus Vivobook F510UA-AH51 is replacing chromebooks running windows as my new carry laptop. It has an 8th-gen quad-core i5 processor, 15.6″ full-HD display, comes with 8GB DDR4 (supports up to 32GB), WiFi, USB 2,3,C, fingerprint reader, and HDMI. It weighs only 3.7lbs, is thin, has a very small charger, and looks decent.

The battery life is 6-7 hours which is a little less than I’d like, but the main compromise Asus made with this laptop was an old-fashioned, slow 1TB HDD that cripples its speed. Fortunately, you can add an M.2 SATA SSD and turn it into a speedy little laptop. I installed a Crucial MX500 M.2 SATA drive ($40 on amazon) which pleasantly came with Acronis True Image that allowed me to clone Windows from the 1TB HDD onto the M.2 SSD. The result is windows running on the SSD and the 1TB HDD available for bulk storage.
Installing the SSD requires opening the back of the machine (lots of screws including two hidden under two of the rubber feet); you’ll want a proper pry tool (or a guitar pick) to release the thin plastic clips that retain the back once the screws are removed. YouTube has many videos showing how to open the case; and since it’s a bit of a pain, I installed another 8GB of memory ($32 on amazon) while it was open.
The net result, while costing closer to $400 than my target $300 is a fast, light ultrabook with loads of storage and most modern features. A touchscreen and longer battery life would be nice, but not a big deal and overall, this is a great value and suitable for all student/business/development needs!
More crooks from China: Shenzhen Enbar
eBay isn’t the only place where bad companies and individuals hang out. Regardless of the market, a lot of them are in China. Here’s some information about how to check for Chinese scam companies.
I bought 100 ER34615 lithium batteries with custom pigtail connectors from Shenzhen Enbar on Alibaba. Within a year, all of them were dead whether they had been used or not. This type of battery has a 20+ year shelf life. Taking the generically marked shrink-wrap off the failed batteries, there were numerous spot-weld marks on the battery anode where a different tab had been mounted.

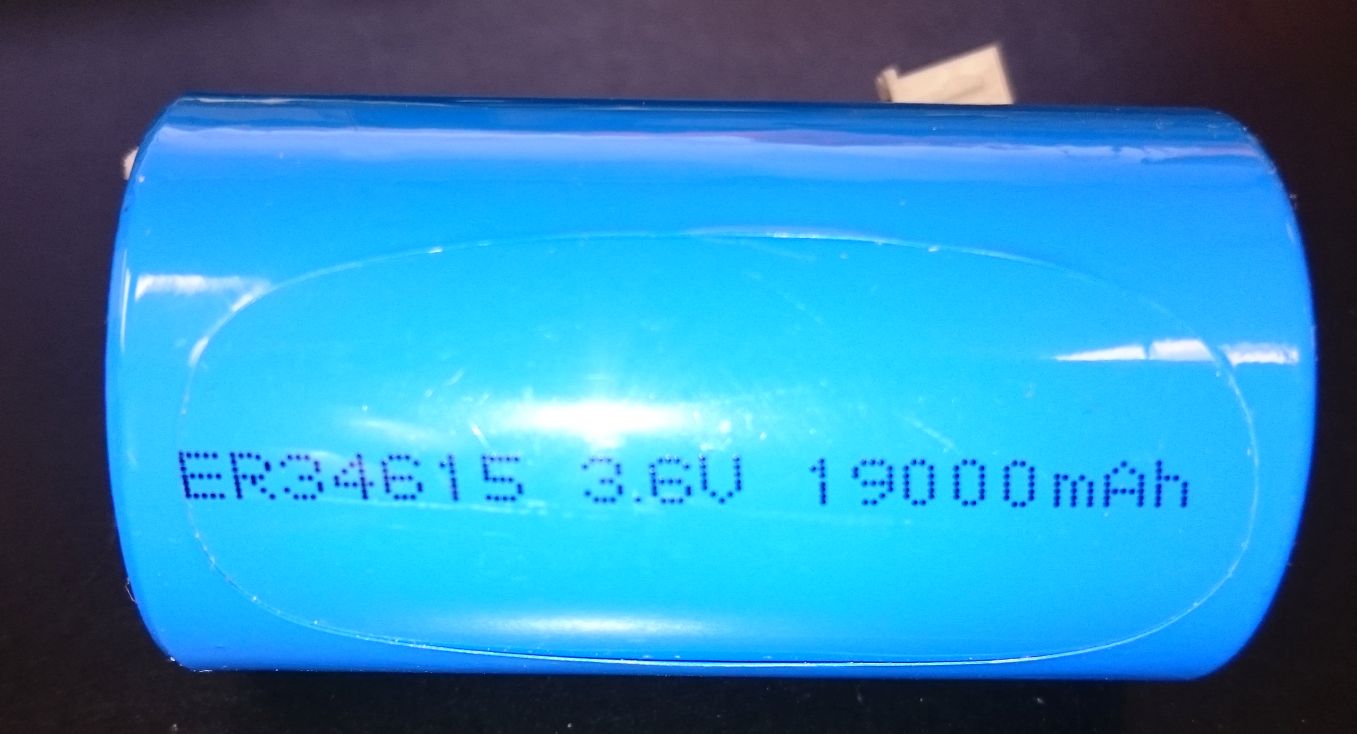
I understand that every company occasionally has a bad batch so I reached out to them to analyze the failures, but they had no interest in that and suggested that I just buy more batteries from them! Their “engineer”: Eric Lee insisted that their batteries must be used within 6 months or they will be destroyed by passivation (the normal process of building up a thin oxidation layer that is precisely what gives the batteries their long storage life). He sent me a datasheet with the specs for their batteries that includes “Long Storage Life”…and complained that I had embarrassed him by bringing up the failures! They are obviously not a legitimate or reputable company.
It turns out that a common scam in China is to take batteries that have been sent for recycling, put new shrink-wrap on them and resell them as new (at a discount of course). Buyer beware.
I won’t be buying from Shenzhen Enbar again.
XL6009 Switching Converter – Warning
The XL6009 is a nifty, inexpensive switching voltage regulator from XLSemi. (see datasheet). There is also the XL6019 (see datasheet). They are great parts and operate over a wide input voltage range at high efficiency and their internal switch can deliver substantial current. They can operate in boost and SEPIC/Buck-Boost configurations
HOWEVER you need to be cautious when using the ENable pin (2): the datasheet indicates that EN is a TTL compatible input and considers anything over 1v4 as High (Enable) – that’s good. It also mentions that if left unconnected, the pin floats high (enabled) – that’s also fine.
What wasn’t apparent to me, and certainly isn’t spelled out in the datasheet, is that when the EN pin floats high, it is at Vin and can source enough current to do damage. So if you are using the converter to boost say 12V to 24V, you’d better not connect that EN pin directly to a microprocessor GPIO because the processor pin will be at 12V and will be destroyed! (as I learned the hard way)
The solution of course is simple, just use the processor GPIO to drive a transistor in an open drain/open-collector arrangement to disable the converter. A common 2N2222 or 2N3904 should work just fine over the full input range of the XL6009. Live and learn.
Acer Chromebook 15 Windows
As I’ve gotten older, small screens have increasingly become a problem. I love the real-estate of a full-HD (or bigger) screen, but when they’re smaller than 15.6″, the fonts are getting hard to read for these old eyes.
There aren’t many 15.6″ laptops that met my requirements (1080p, long battery life, 4GB or more, core i5 or better, light weight), especially when you want it to be inexpensive: I prefer not to carry something that costs more than around $200 because laptops get broken/stolen/lost/etc.
So I bought an Acer Chromebook 15 on eBay for $180 and so far, I like it a lot. I replaced the stock 32GB SSD with a KingSpec 256GB SSD (M.2 2242) bought on amazon for $34.15 and installed Windows 10 Pro 64-bit from SCDKey using coolstar.org replacement BIOS. It’s a bit over budget, but still pretty close to the $200 target and it is now a very serviceable Windows laptop with decent battery life, speed (core i5-5200), and a screen I can read. The battery is replaceable and widely available so when that run-time starts to decline, that’s fixable too.
It could be a little lighter and I would have liked more RAM, but it runs all of the software I use and is pretty snappy. Overall, Acer chromebooks continue to impress me!
Windows Programming in C???
I usually use Java when developing desktop software, but I recently had need to develop code that provided both a Windows GUI and also supported low-level interface with hardware connected to the PC. Java is great for developing GUIs and I still like the ancient Matisse GUI builder for Netbeans/Java Swing – I can knock out GUIs really fast with it…however, Java apps can be big and slow and interfacing Java with custom hardware is painful..so I looked into developing Windows native GUI apps in C to give really fast and small code that can interface easily to hardware…and have been pleasantly surprised.
Two things helped:
- The free, excellent Pelles C Compiler/IDE
- The (also excellent) WinAPI tutorial at Zetcode
The Pelles tool is slick, fast, and provides wizards for anything you’d want to build for a Windows target. The tutorial provides loads of compact runnable examples showing how to use each widget and feature of the WinAPI. There are other good WinAPI tutorials as well such as The Forger’s tutorial.
Next: find a GUI builder like Matisse for WinAPI. Pelles includes a resource editor but not a full GUI builder.
Mustool == Junk?
This is my second post about disappointing Mustool products (there won’t be a third).
I use stereo optical microscopes when doing surface-mount electronics (SMT) assembly and inspection. They work well, but are large and heavy. I decided to try one of the inexpensive “digital microscopes” that was reviewed well and looked like it had a large relief distance (the distance between the lens of the microscope and the item being viewed) which is important so you have room to work. I ordered the Mustool G600 from Banggood.
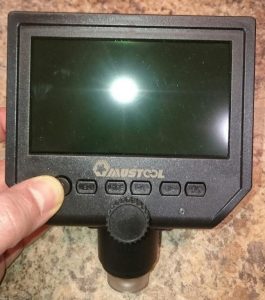
The good: the aluminum stand was easy to assemble and they even included the required Allen key. The stand works well, adjusting the microscope height is smooth, and the relief is indeed quite good. When I first turned it on, the buttons were a little unresponsive and it presented a menu that I couldn’t navigate, but after turning it off and back on, and adjusting the smooth focus knob, the microscope gave a clear, sharp picture.
Small bad: I didn’t realize how beneficial stereo is to SMT work. With a mono image, even though it was sharp, I didn’t have any depth perception which made it hard to tell how high above the board my soldering iron and solder were. It’s possible I’d get used to this but I’ll never know because…
Big bad: I played with the microscope for 5-10 minutes and then turned it off. When I tried to turn it back on…nada: just a black screen. I tried charging it, resetting it, pressing every button combo I could think of and it just remains unresponsive. So it’s dead.
The worst: I received the package during the week and didn’t have time to play with it until the weekend which was past the Banggood 3-day warranty period – yes, you read that correctly: 3 days. So any money I saved by purchasing on bangood is now easily offset by the $42 wasted on this piece of junk – not to mention the time and aggravation.
This is my second extremely disappointing mustool purchase; the first was their MT8205 scopemeter – which was also a complete waste and you can read about it in my blog. I will not purchase anything made by Mustool again; fool me twice…shame on me.
Until now, I’ve been a big advocate of banggood; they refunded my purchase price for the MT8205 – which reinforced my faith in them as a seller. It’s a shame they are now carrying such junky products and chasing them with a ridiculous warranty. I’m going to have to re-think purchasing from Banggood since the same products are usually available on amazon with reasonable warranty and return policies.
eBay crooks: flyxy2015, 3c_topstore
I buy a lot of gear on eBay and the overwhelming majority of sellers are excellent, but every now and then you meet the crooked ones. This post is to help others avoid getting scammed by two bad sellers: flyxy2015 and 3c_topstore:
1) Seller flyxy2015 sold me a 10MHz OCXO distribution amplifier. However, the OCXO I received was far off frequency and not within the correctable range. The seller offered to ship a replacement for the internal Dapu OCXO; I took him up on this and of course what he really did was wait out the eBay return period without ever sending the replacement part. Scam artists like fly-xy are part of why people are reluctant to use eBay.
2) Another seller (3c_topstore) sold me a scam graphics card. The card had been altered to appear to be a more expensive card so it sort of worked, but it crashed whenever the driver tried to use the more advanced features or full memory of the card. It was tricky to figure out what was wrong so by the time I understood the problem, the eBay return period had expired. Fortunately, PayPal has a longer return period, but they require shipping the card back which would have cost 3c both the shipping and the original price in order for him to get his useless card back. I thought I’d be a nice guy and offered instead just to split the loss with him…and sure enough, after I’d declined the PayPal return, he went silent and left me stuck with the card.
So in short, a popular eBay scam appears to be to sell you bad product that is either not obviously bad (so it takes you a while to discover it) or to otherwise stall until the return period expires. eBay needs to do something about this because it is a growing problem that will ultimately hurt their reputation. Until they figure it out, if you want to avoid crooks, stay away from eBay sellers flyxy and 3c_topstore.
Caveat emptor.
MT8205 review – piece of junk
I’m always looking for bargain test equipment, and sometimes I get burnt; hopefully this review saves you from wasting some time and money.
I bought the Mustool MT8205 from Banggood who advertise it as a “2 in 1 Digital Intelligent Handheld Storage Oscilloscope Multimeter AC/DC Current Voltage Resistance Frequency Diode Tester”; it sells for just under $50 shipped. I love Banggood and have had lots of good experiences with them, but buyer beware: this product is a waste of money at any price. (Update: Although this product is something to avoid, Banggood is wonderful and I highly recommend them. They took this product back at their cost just because I was unhappy with it…now that’s great customer service!)

Mustool MT8205
While it looks good, feels solid, and comes with nice probes and case, it simply isn’t useful for making measurements as my tests below will show.
Let’s start with how it works as an oscilloscope since that’s the interesting feature of this device. When I ordered it, the ad said 200ksps which would suggest it is useful to look at signals up to at least 20kHz…not great, but at good enough for looking at audio and PWM waveforms. However, as the ad now says, the analog bandwidth is limited to 10kHz. A 15kHz signal is severely distorted and it won’t even try 20kHz. A 10kHz ramp looks just like a 10kHz sinewave. See the pictures below where I feed it a 15kHz sinewave and a 20kHz sinewave from a Rigol signal generator showing that the bandwidth is indeed limited to 10kHz (i.e. useless). There are other issues too: there is no trigger control, the signal is always AC-coupled (so you can’t measure anything DC), there are none of the controls you’d expect to find on an oscilloscope and it’s too slow for virtually anything these days. The scope feature is a complete bust.
To add insult to injury, the multimeter functionality is useless too! The readout is only 3 digits and even those aren’t accurate! I hooked the meter up to a lab voltage standard and checked the output with a calibrated 7-digit HP bench meter. The 10.0000V standard was dead on with the HP meter, but read 9.95v on the Mustool. What’s worse, when I used it to measure 2.5v and then used it to measure 10v again, it took several (I’m talking 4-5) seconds for the readout to gradually climb to 9.95. Useless.
Summary:
- Large/heavy/manual-ranging multimeter
- Only 3 digits, only 2 of which are accurate (see 10vdc lab standard)
- Incredibly slow: takes several seconds for voltage to read properly
- Limited to 10kHz analog bandwidth
- AC coupled only
- Oscilloscope has no controls so not even useful as a teaching tool
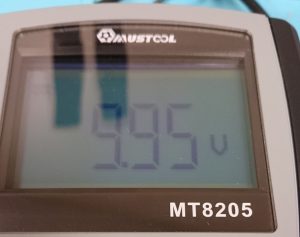
10VDC from Lab Standard
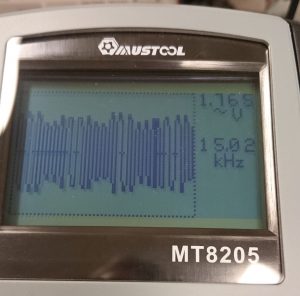
15kHz sinewave
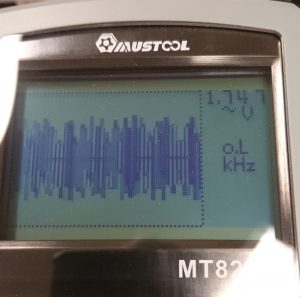
20kHz sinewave
