
It takes a lot of time to setup a server and then it must be maintained including regular backups. Virtualization can help with a lot of this. Modern computers have lots of cores, memory, and disk space so it is now possible to run multiple servers as virtual machines within a single physical server. This arrangement offers lots of advantages including:
- Use resources efficiently – many servers only use a small fraction of the physical machines capability so you can easily run quite a few virtual servers on one physical machine.
- Keeping servers and their environments separate helps avoid conflicts
- Easily perform “bare metal” backups of virtual servers and restore them to the same or a new physical server for quick disaster recovery.
- Easily allocate and expand resources (within the limits of the physical server)
I generally run my home servers on Intel NUC platforms because they offer a nice balance of computing power and power efficiency. A basic NUC 12 Pro with an i5-1240P or higher processor has at least 12 cores, up to 64GB of RAM, a fast NVMe gen 4 drive, 2.5GbE, and a TDP of only 28W. They idle around 5W, so they are gentle on your electricity consumption. For bulk storage, you can use a NAS or connect a DAS via USB3.2 for very high speed. They stack, they’re small, quiet, and the low power consumption means a typical UPS will carry them through most outages. In short, they’re great little servers.
For virtualization, I like Proxmox. Proxmox is Debian based; it installs quickly from a USB flash drive and provides a friendly web-based management interface that is exactly what’s needed. It allows you to see the status and manage both the physical server and the VMs. It has a tightly integrated KVM hypervisor so you can access the console of each VM and the physical server remotely via the web interface.
Proxmox VMs are efficient, but Proxmox also supports LXC containers which are even lighter weight (they share an OS rather than running on complete virtual machines); they are analogous to Docker containers, but much easier.
Proxmox also makes it easy to make “bare-metal” backups which take a snapshot of the entire VM that can be easily restored in case of disaster either on the same physical server or a new server. The backup files are sparse and compressed; a machine with 64GB of storage that is using 24GB will yield a snapshot file ~12.5GB. You can download the snapshots and store them on bulk storage and off-site. The fact that Proxmox is so easy to install and that you can then restore entire VM snapshots quickly means that even if the physical server and/or storage failed completely, you can be back up and running on a new machine in less than 30 minutes. (I have done this)
Many servers don’t need a lot of compute power; most of mine do just fine with 4-8GB of RAM 2-4 cores, and 32-64GB of storage. This means I can host several servers on a NUC12 without it breaking a sweat. Keeping servers separate (e.g. database, middleware, web applications, etc.) makes it easy to scale and to upgrade individual servers without software or hardware conflict with others.
Update Sept 2024:
I have been using Proxmox for a few months now and still like it a lot; it simply works. The web-based management is perfect – exactly what’s needed for managing VMs with excellent status-at-a-glance and detailed configuration pages. I have resized VM hardware allocations on the fly several times and the interface is fast and intuitive. The bare-virtual-metal backups are easy to do and give me confidence about disaster recovery.
The only thing I think proxmox should change is their lowest tier (community) pricing/model:
- I hate renting software; if they simply charged a fixed price with optional annual maintenance, most serious users (including me) would likely end up buying the maintenance anyway since nobody wants to run a server without the latest security fixes. However, I don’t want that decision forced on me; I like to own not rent.
- The per-socket pricing effectively forces certain hardware choices: in particular, a single high-power server over a few low-power machines (like NUCs) that have been re-purposed. This removes a certain level of flexibility (the opposite of everything else about proxmox). For the community model, a site-license that covered a small number of machines or some aggregate level of computing power might make more sense.
- Finally, $110/year/socket is well above the no-brainer cost for most users. I’d bet proxmox would net significantly more revenue if they lowered their community pricing to the ubiquitous $99 purchase + $49/year optional maintenance.
Update April 2025 – how to backup servers
One of the biggest benefits of Proxmox is the ease with which you can have VMs that are automatically backed up on a schedule. The backups are bare-metal backups that can easily be restored on the same or another host machine, making it easy to recover from hacking or a catastrophic hardware failure.
Each Proxmox host (proxmox physical server) periodically and automatically backs up each of its VMs to a QNAP NAS. I periodically make cold backups of the NAS backup volume and store them off-site.
The NAS and Proxmox host machines are on a secure VLAN with no external access. The Proxmox host is configured to be VLAN aware. VMs that require internet access (e.g. webservers) are placed on a separate VLAN. This setup allows the host machines to access the NAS and backup the VMs there, but keeps the NAS off the internet:
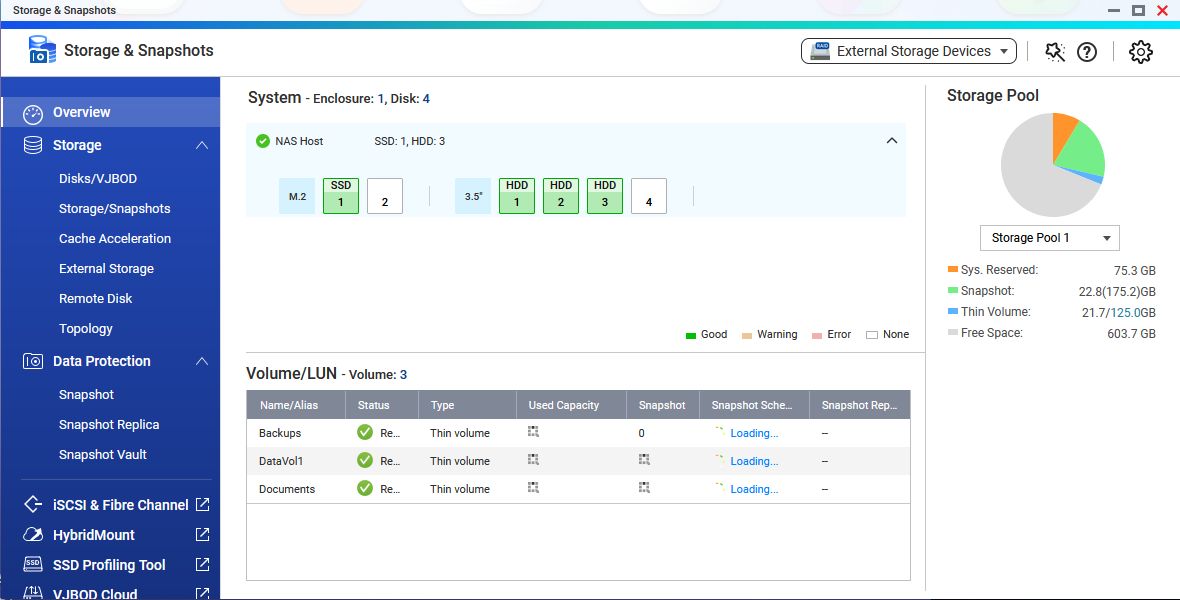
QNAP NAS Setup
- QNAP NAS serves a shared volume (e.g. Backups) that is created in the Storage & Stnapshots application. I use a Thin volume (so it can be easily resized) with snapshots turned off (there’s no reason to snapshot backup images).
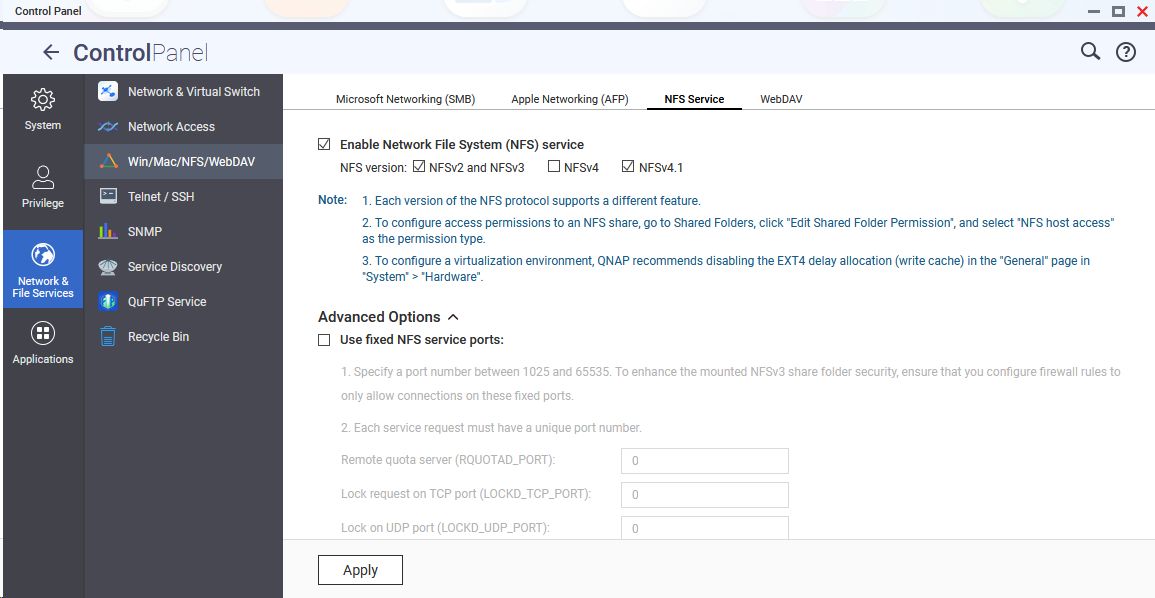
- Enable NFS sharing using Control Panel -> Network & File Services -> Win/Mac/NFS/WebDAV->NFS Service tab: check “Enable Network File System (NFS) service” and (at least) NFSv4.1
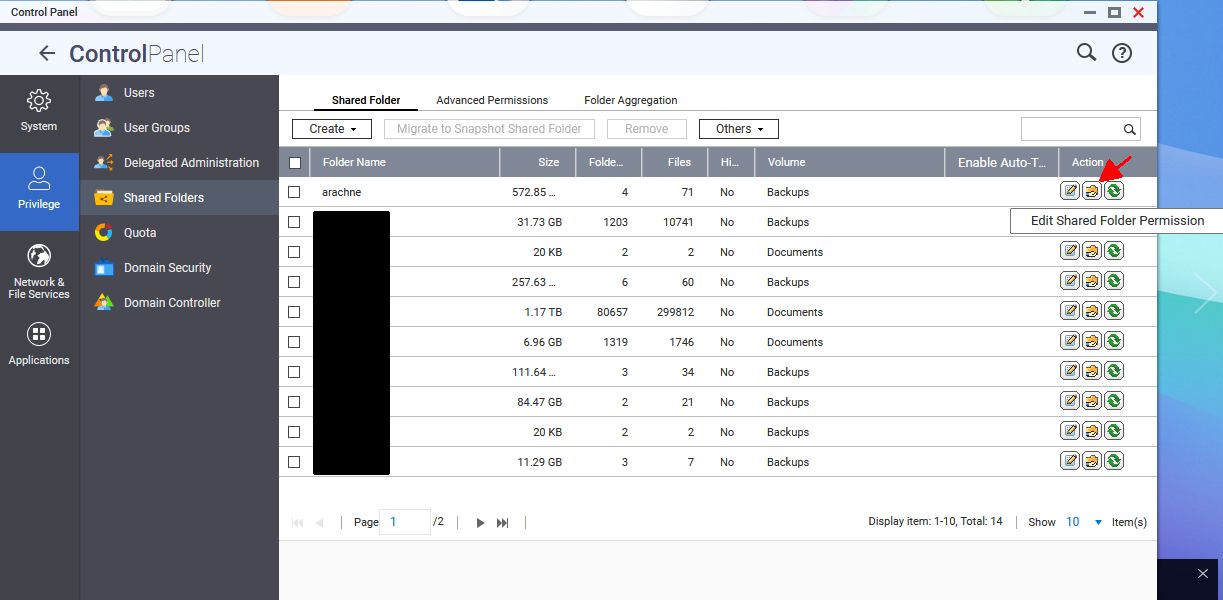
- Create a folder within the shared volume for each server using the FileStation 5 application.
- Enable NFS sharing for each host backup folder using the Control Panel: Privilege->Shared Folders->Action->Edit Shared Folder permission (yellow icon under Actions).
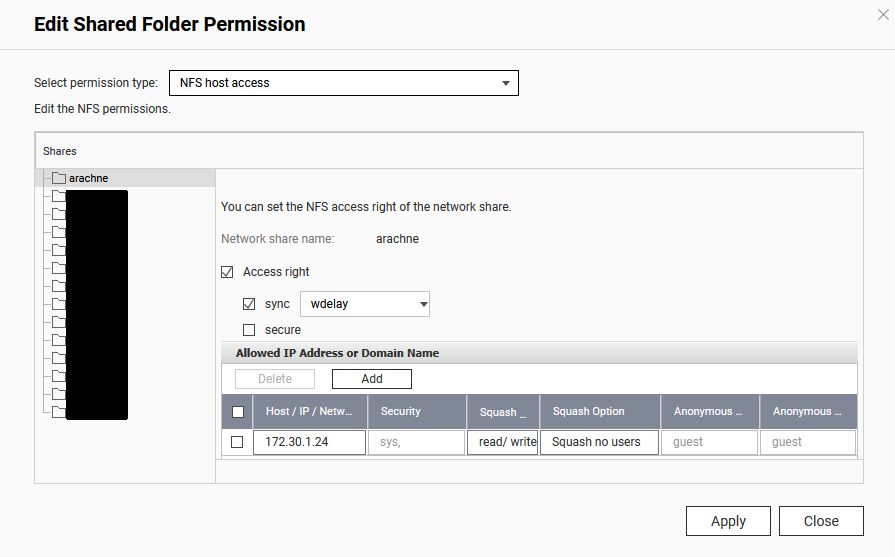
- Select permission type: NFS host access: check Access right, sync (wdelay), and add your server IP (squash option: read/write, Squash no users).
At this point, you have created a backup folder on the QNAP NAS for each server that can be mounted by that server so Proxmox backups can be written to/read from the NAS.
- Select permission type: NFS host access: check Access right, sync (wdelay), and add your server IP (squash option: read/write, Squash no users).
Proxmox Server Setup
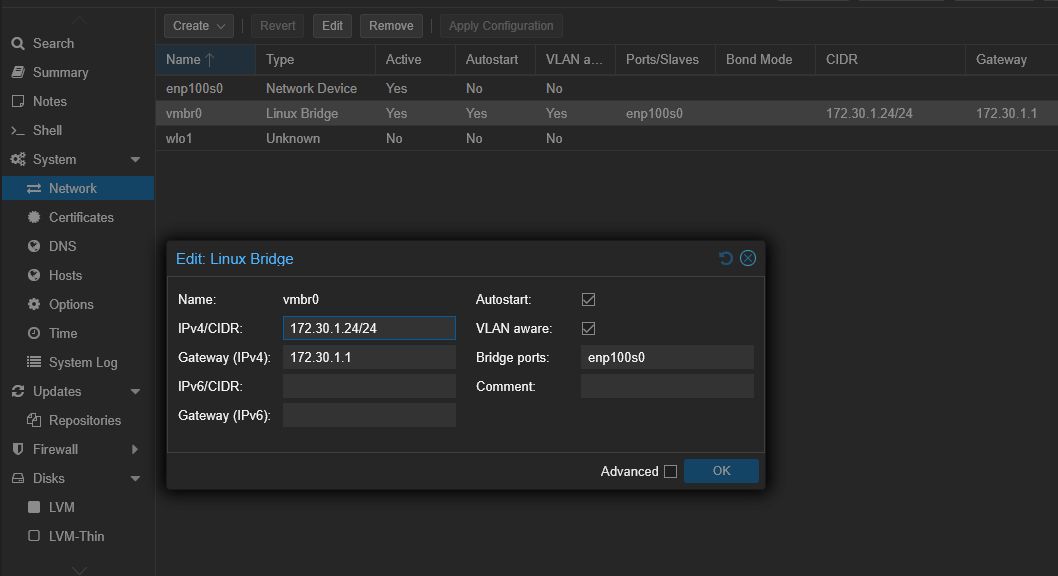
- Each proxmox host should be configured to be VLAN Aware (<hostname>->Network->vmbr0->VLAN aware checked)
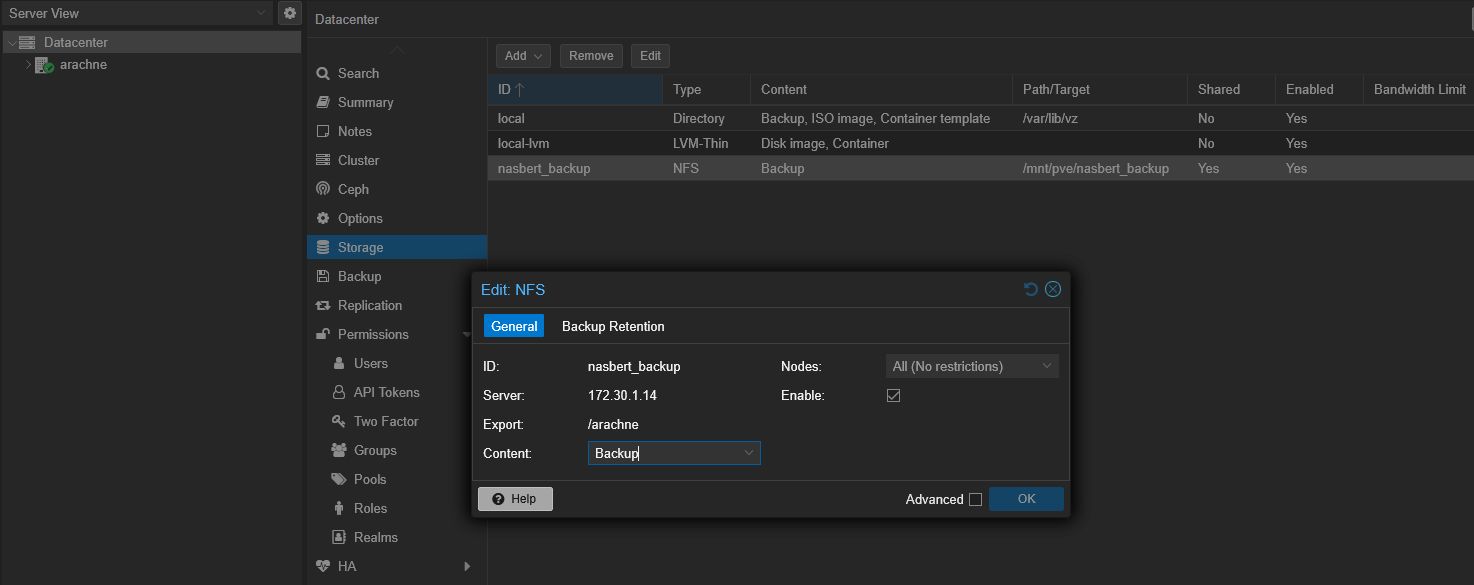
- Each proxmox host should be configured to mount its backup folder on the NAS as a drive on the host: Datacenter->Storage->Add/Edit. The ID is a name you want to give the mounted on this host. The server is the name or IP of the NAS and the export is the name of the backup folder exported by the NAS.
- Configure the proxmox host to automatically back up your selected VMs to the mounted backup folder periodically (e.g. weekly or monthly or otherwise according to your needs:
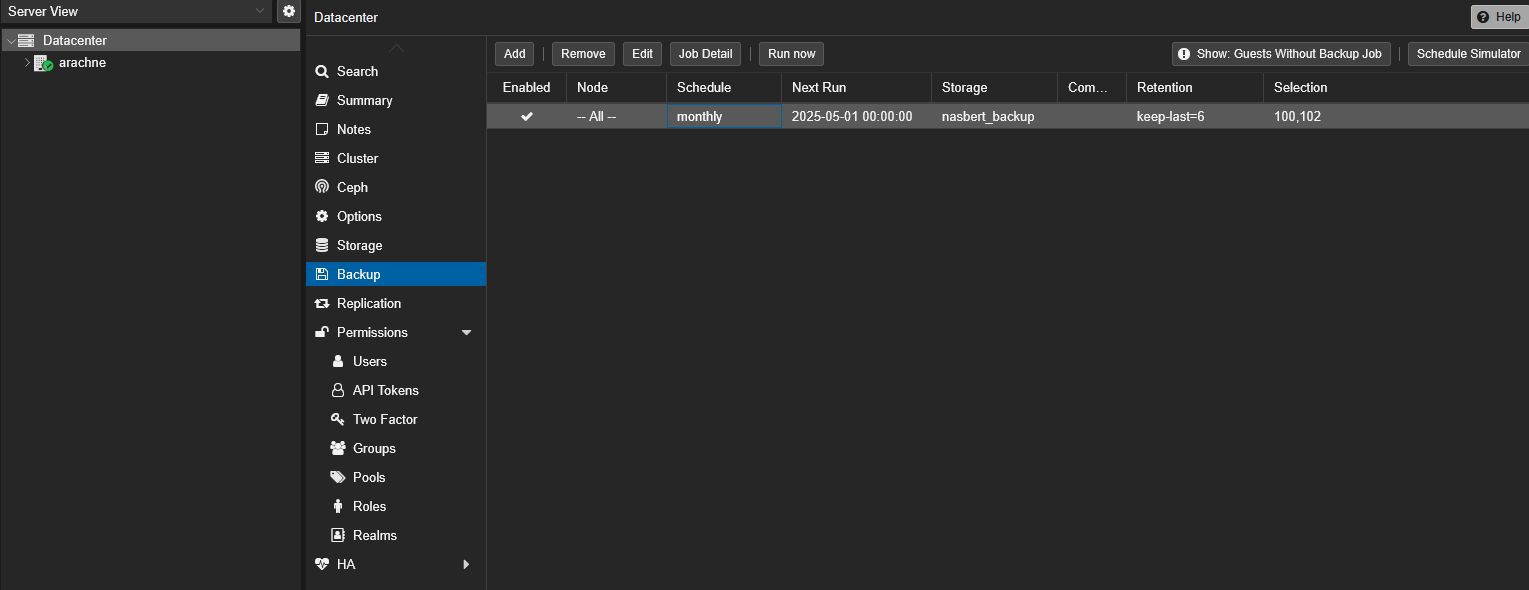
Note: I use Compression=ZSTD, Mode=Stop (shuts down the VM to do the backup so that integrity is guaranteed). I configure the backup automation to retain some number of weekly and/or monthly backups on the NAS.